So, you’ve dusted off the ultrasound machine and have a vague recollection of the machines knob-ology. Twist this and zoom in, twist that and everything brighter. You know deep down inside, there is more to it..well, here is a quick go-to reference for you to use when the time calls!
Environment
- Access to a power supply – think health and safety here, no power cables across floors..especially in the dark!
- Dark room – put simply, you’ll see the images better this way.
- Position – try to be able to comfortably reach the patient and the machine whilst scanning, you don’t want to be distracted by pesky back pain. Also, consider the comfort of the person/s restraining the patient for you!
- Zen – keep the room as calm, quiet and with as few interruptions as possible. De-stress/pheromone plug-in diffusers, or sprays, where appropriate can make a big difference to the patient.
Equipment


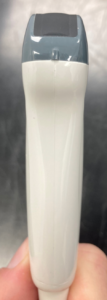
It is quite likely you have access to a micro-convex transducer – which looks like this…
- Take a closer look – there will be a symbol/marker on the screen which will correspond to a notch which you will find on the probe head. Try to get into the habit of keeping dorsal or cranial on the left of the image!
- Hold the probe like a pen and keep this hand close to the patient, your fine motor skills will thank you for this!
Basic knob-ology
Every machine will vary – but you should be able to find labels for the knobs.
- On/off button – Self explanatory, but if you’re not sure..ask someone!
- Patient info – Particularly important, you can enter the patients details to ensure you can easily refer back to the images if required.
- Probe – Make sure the probe selected on the machine matches the probe you would like to use.
- Depth – Thats right, the ‘zoom’ button! Try to make a habit of adjusting the depth so as the area of interest fills 75% of the screen. You will see lines with numbers to the side of your screen, corresponding to the depth in centimetres.
- Frequency – Think of this as your resolution button. The higher the frequency, the ‘better’ the resolution but the depth of penetration will be reduced. Try to find a happy medium!
- Focal point – Here you are telling the ultrasound where to ‘focus’. Having this placed just below your region of interest will be optimal.
- Overall gain – This will increase or decrease the ultrasound signal strength – essentially adjusting how bright or dark the images are. You may find your image may become too dark (under-gained) or too bright (over-gained) as you practice finding a happy medium.
- Time-gain-compensation – Those fun little sliders you never touch! These will adjust the gain at the corresponding depth at which you ‘slide’. Have a play with these – slide the middle sliders only all the way to the left, notice what happens!
- Freeze – As it says on the tin. Did you know, often you can scroll back to see previous frames using the rollerball?
- Calipers – You can take measurements between two points.
- Save – Saving the images, with or without measurements, can be useful to refer back to for a number of reasons.

Remember, this is a brief introduction – if you feel so inclined..have a rummage and find the user manual for your machine! There will be variation in knob location, so also take the time to get acquainted with your machine when you got some time to spare (lets not use the Q word!). Now…practice, practice, tinker and practice some more!
This blog series will continue..so watch this space! There will be more info about getting to know your machine and also keep an eye out for some wise words from my colleague Rebecca Ewbank RVN!